Webhook configuration guide
Introduction
Webhook keys are configured for data ingestion and remote command under three tabs in the Configuration section of [REDACTED]:
- Data Ingestion
- Integrations
- Utility Command
The steps to reach the webhook configuration settings differ slightly across these modules, but the configuration process itself is the same once you are there. Refer to the documentation for each module to learn how to access its webhook settings.
You can authenticate webhook data with either API keys or JSON web tokens (JWT). API keys verify your integration's identity and permissions. JWTs are a more secure option that digitally sign the payload and can carry additional claims.
JSON web token authentication is disabled by default. To enable it:
- Go to the Configuration > Application Settings > Web Config.
- Locate the
EnableEnhanceWebhookAuthenticationconfiguration key. - Set the value to
True.
Once enabled, [REDACTED] will reject any webhook requests that lack a valid token.
Event/Incident intake
The webhook ingestion method lets an integration send event or incident data as JSON for investigation in the [REDACTED]. You can configure this from the Data Ingestion and Integrations tabs under Configuration.
Authentication method: API keys
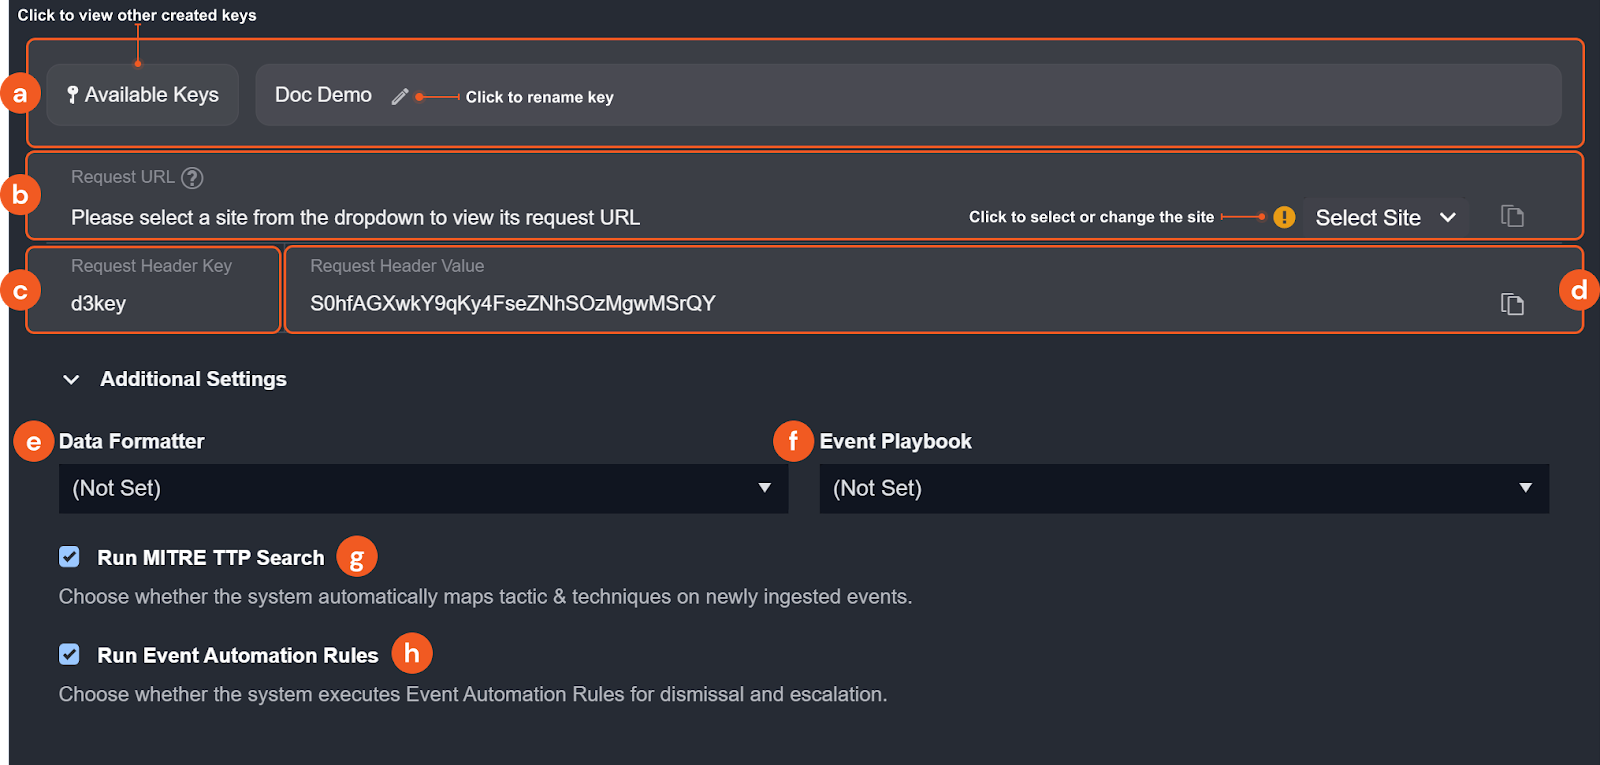
-
You have the option to rename the key, assign or change the assigned user, view other created keys on the site accessible to your user account and regenerate existing keys.
-
Request URL: The endpoint to target when sending data into [REDACTED]. Use the Select Site dropdown to choose a site and display its corresponding URL.
-
Request Header Key: The header field name to include in your API request for authentication.
-
Request Header Value: The credential to pass as the value of that header field.
-
(Optional) Data Formatter: Select a data formatter to run a formatting command on the incoming event after they are ingested. Data formatter commands can be configured in Utility Command with the Event/Incident Data Formatter feature enabled.
-
(Optional) Event Playbook: Select an event playbook from the dropdown. This determines which event playbook runs automatically when a event is ingested.
-
(Optional) Run MITRE TTP Search: Check the box to automatically map ingested events from to MITRE tactics and techniques.
-
(Optional) Run Event Automation Rules: Check the box to allow event automation rules for dismissing or escalating events.
NoteThe Run Event Automation Rules setting does not apply to incident intake commands.
Authentication method: JSON web token (JWT)

-
You have the option to rename the key, view other created keys on the site accessible to your user account, and specify its visibility to all users.
-
Request URL: The endpoint to target when sending data into [REDACTED]. Use the Select Site dropdown to choose a site and display its corresponding URL.
-
Request Header Key: The header field name to include in your API request for authentication.
-
Header: The header JSON object used to generate the JWT. It consists of three parts: the signing algorithm being used (HMAC-SHA256), the key ID, and the token type (JWT).
-
Payload: Enter the first-level keys of your request body data as the payload fields. For example, given the sample request body below, you would enter
Username,Site, andCommandParamsas the payload fields. After entering the key fields, copy the payload value using the copy button. This value is required for generating the JWT.json{
"Username": "Admin",
"Site": "Security Operations",
"CommandParams": {
"Start Time": "2020-09-01 00:44:45",
"End Time": "2020-09-01 17:44:45",
"Number of Event(s) Fetched": 5,
"Search Condition": "search host=\"Cyber-2\" | head 10",
"Artifact": null
}
} -
Secret Key: Click and hold to reveal the secret key. This is only available if you are the creator or assigned user of the key.
-
(Optional) Data Formatter: Select a Data Formatter to run a data formatter command on the incoming event after ingestion. Data formatter commands can be configured in Utility Command by checking the “Event/Incident Data Formatter” feature.
-
(Optional) Event Playbook: Select an event playbook from the dropdown. This determines which event playbook runs automatically when a event is ingested.
-
(Optional) Run MITRE TTP Search: Check the box to automatically map ingested events from to MITRE tactics and techniques.
-
(Optional) Run Event Automation Rules: Check the box to allow event automation rules for dismissing or escalating events.
NoteThe Run Event Automation Rules setting does not apply to incident intake commands.
Generating the encoded JWT
Use the following Python script template to generate the encoded JWT using the PyJWT library and the HMAC-SHA256 algorithm.
import jwt
import time

# set the payload of the JWT
payload = {
    "Site": "Security Operations",
    "Timestamp": time.time(),
    "Param1":"my_param_value"
}

jwt_header = {
    "alg":"HS256",
    "kid":"123",
    "typ":"JWT"
}

# set the secret key used to sign the JWT
secret_key = "my_secret_key"

# generate the JWT
jwt_token = jwt.encode(payload, secret_key, algorithm="HS256", headers=jwt_header)

print(jwt_token)
The script requires the PyJWT module. For more information, refer to Installation — PyJWT 2.6.0 documentation.
-
Replace the sample
payloadvalue with the payload array copied from [REDACTED]. -
Replace the sample
jwt_headervalue with the header array copied from [REDACTED]. -
Replace the sample
secret_keyvalue with the secret key copied from [REDACTED]. -
Run the script. The encoded JWT will print to the console. Copy this token and use it to authenticate your webhook request.
Once you have all the necessary values for either authentication method, you can send a REST API request to execute the ingestion command through Postman or other programs. The response will indicate the result of the command execution.
Remote command
The [REDACTED] utility command API allows you to send requests to [REDACTED] to execute configured integration or utility commands via REST API.
Authentication method: API keys
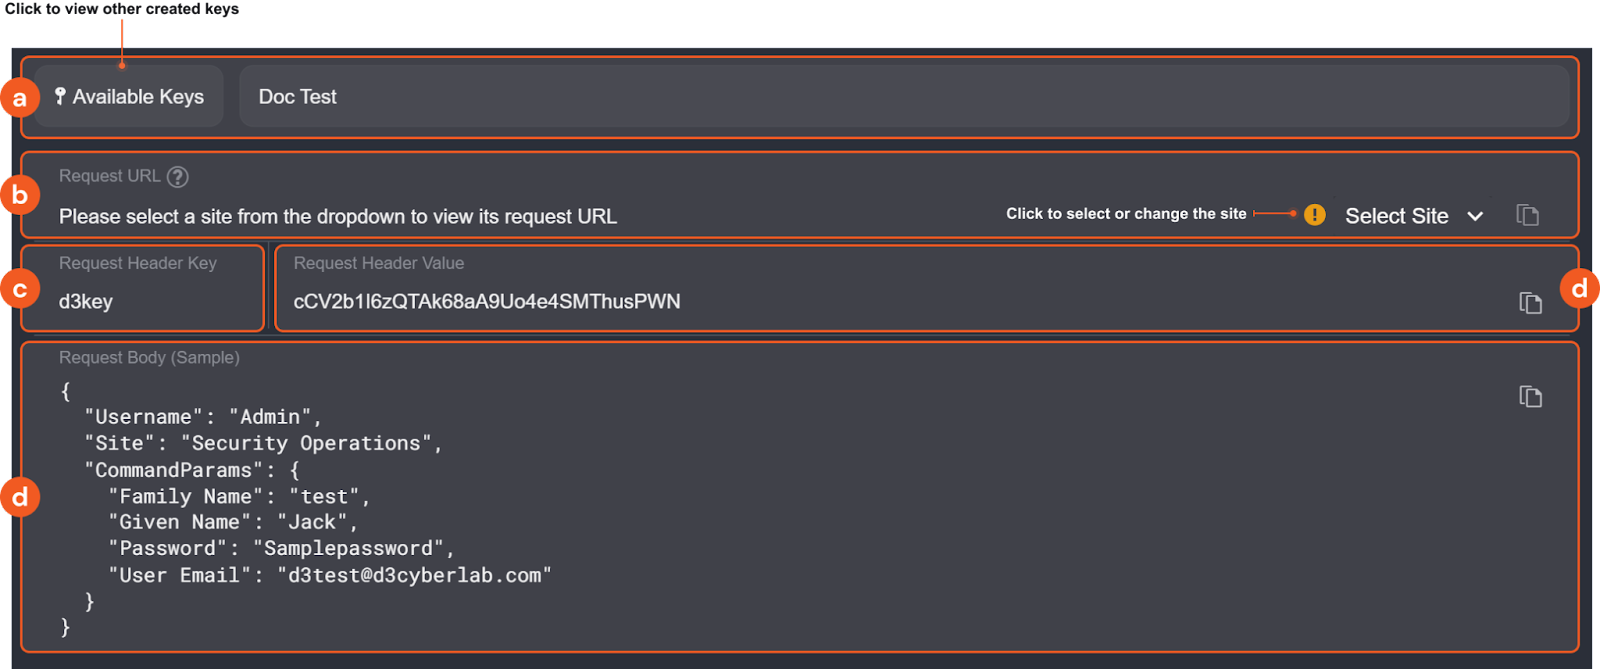
-
You have the option to view other created keys on the site accessible to your user account and edit the name of the key.
-
Request URL: The request URL for the HTTP request. If you are configuring an integration command, use the dropdown to select a site and generate the corresponding URL
NoteThe Select Site dropdown does not apply to utility commands.
-
Request Header Key: The header field name to include in your API request for authentication.
-
Request Header Value: The credential to pass as the value of that header field. To generate a new value, click Regenerate Key.
-
Request Body (Sample): A sample body for the API request. Input parameters vary by command, so you will need to construct body data with the correct structure in your request. Use the provided sample as a template.
WarningThe request body must match the expected structure for the command. Requests with incorrectly structured body data will fail.
Authentication method: JSON web token (JWT)
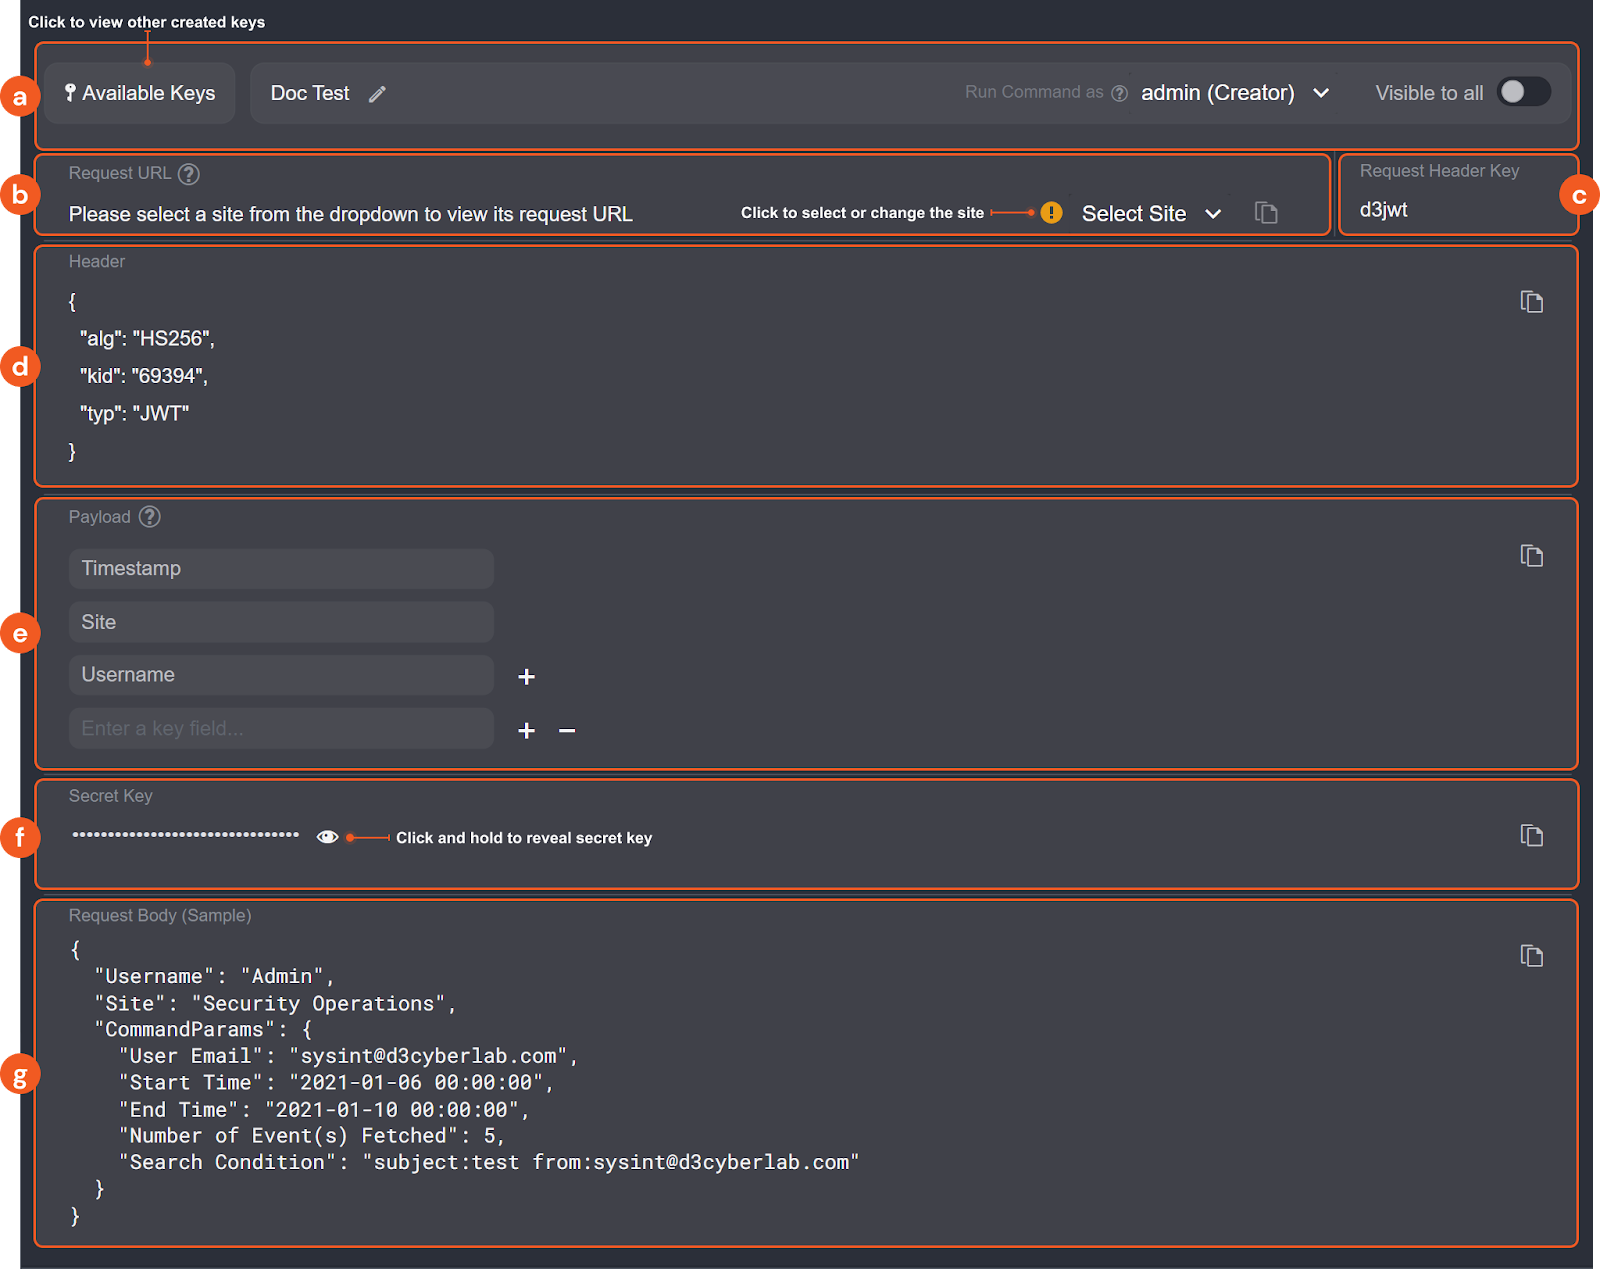
-
You have the option to rename the key, assign or change the assigned user, view other created keys on the site accessible to your user account and specify its visibility to all users. The assigned user will be recognized as the user when a command requires a user parameter.
-
Request URL: The endpoint to target when sending data into [REDACTED]. Use the Select Site dropdown to choose a site and display its corresponding URL.
-
Request Header Key: The header field name to include in your API request for authentication.
-
Header: The header JSON object used to generate the JWT. It consists of three parts: the signing algorithm being used (HMAC-SHA256), the key ID, and the token type (JWT).
-
Payload: For remote commands, the default payload fields are
Timestamp,SiteandUsername. Additional payload fields are optional. After entering the key fields, copy the payload value using the copy button. This value is required for generating the JWT. -
Secret Key: Click and hold to reveal the secret key. This is only available if you are the creator or assigned user of the key.
-
Request Body (Sample): A sample body for the API request. Input parameters vary by command, so you will need to construct body data with the correct structure in your request. Use the provided sample as a template.
WarningThe request body must match the expected structure for the command. Requests with incorrectly structured body data will fail.
Generating the encoded JWT
Use the following Python script template to generate the encoded JWT using the PyJWT library and the HMAC-SHA256 algorithm.
import jwt
import time

# set the payload of the JWT
payload = {
    "Site": "Security Operations",
    "Timestamp": time.time(),
    "Param1":"my_param_value"
}

jwt_header = {
    "alg":"HS256",
    "kid":"123",
    "typ":"JWT"
}

# set the secret key used to sign the JWT
secret_key = "my_secret_key"

# generate the JWT
jwt_token = jwt.encode(payload, secret_key, algorithm="HS256", headers=jwt_header)

print(jwt_token)
The script requires the PyJWT module. For more information, refer to Installation — PyJWT 2.6.0 documentation.
-
Replace the sample
payloadvalue with the payload array copied from [REDACTED]. -
Replace the sample
jwt_headervalue with the header array copied from [REDACTED]. -
Replace the sample
secret_keyvalue with the secret key copied from [REDACTED]. -
Run the script. The encoded JWT will print to the console. Copy this token and use it to authenticate your webhook request.
Once you have all the necessary values for either authentication method, you can send a REST API request to execute the remote command through Postman or other programs. The response will indicate the result of the command execution.